Ray Tracing in C++ Multithreading
Ray tracing, a powerful technique for rendering scenes, is ideal for showcasing the prowess of multithreading in programming. In this post, I dive into the details of converting a single-threaded ray tracing program into a multithreaded one using the codebase from the Ray Tracing in One Weekend Book Series, specifically focusing on the second article, the Ray Tracing: The Next Week.

A scene is constructed using ray tracing with 8192 samples per pixel, taking 6.6 hours with CONCURRENCY=4.
The Fundamentals of Ray Tracing
Ray tracing involves simulating the trajectory of rays as they traverse a scene. To keep our focus on multithreading, I’ll touch upon essential aspects of ray tracing related to multithreading without delving into intricate ray tracing details.
Shooting Primary Rays
In a nutshell, a primary ray emits from the observer’s eye, intersects the midpoint of a pixel, and collides with an object, resulting in an image formation. This process is replicated for each pixel, ultimately crafting an image, such as that of a ball as shown in the images below. The two images below are adapted from Scratchapixel.
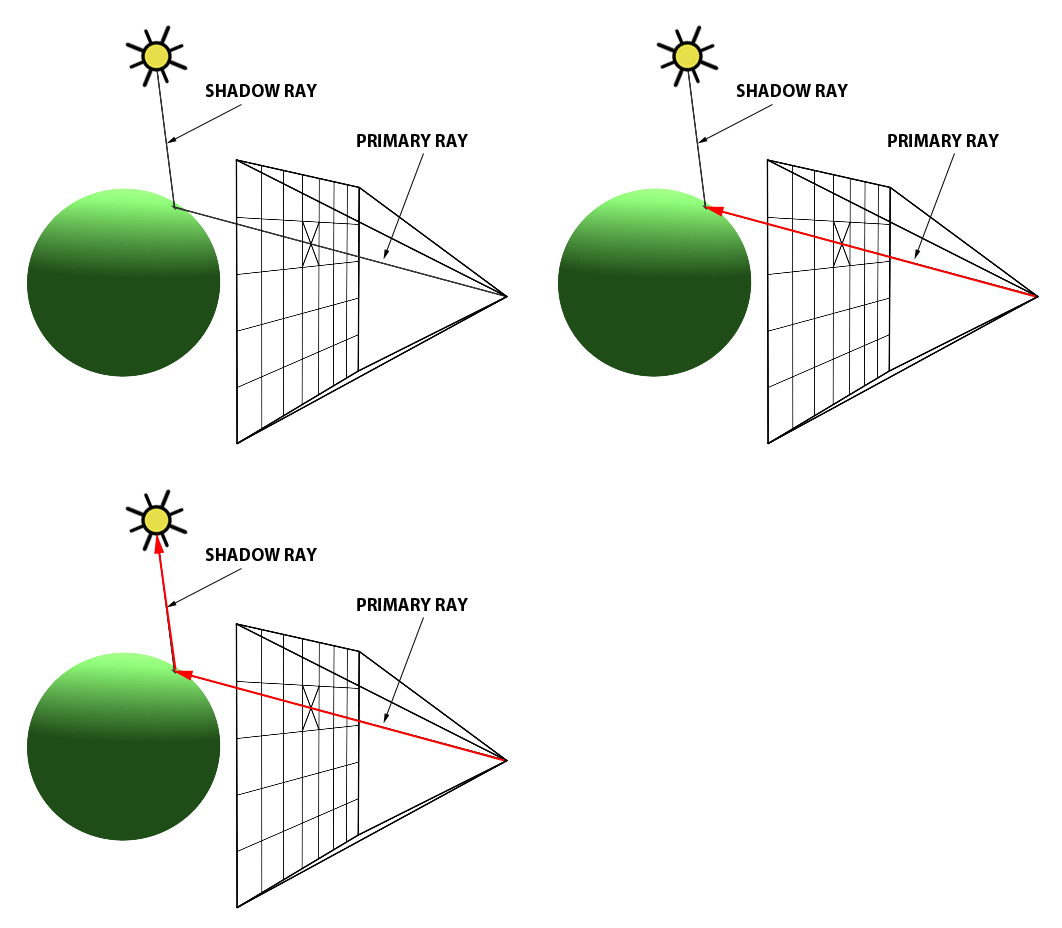
A primary ray emits from the observer's eye and intersects the center of a pixel.
Shooting multiple primary rays forms an image.
It’s important to note that I am grossly simplifying ray tracing in this post. Given the post’s primary focus on integrating multithreading into a single-threaded program, intricate details of ray tracing are omitted. For an in-depth understanding of ray tracing, I recommend consulting resources like the Ray Tracing in One Weekend Book Series and an excellent tutorial on ray tracing from Scratchapixel..
Anti-Aliasing
Note: Images in this section are adapted from OpenGL Anti Aliasing.
Another crucial aspect of ray tracing involves anti-aliasing. Consider the following example illustrating the concept:
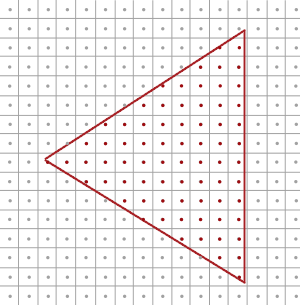
A rectangle is sampled with one middle point per pixel.

After sampling, the triangle is with non-smooth edges.
Choosing only a single sample at the center of a pixel yields an outcome resembling a triangle with uneven edges, as depicted above. A more effective approach involves selecting multiple sample points within each pixel and computing the pixel value by averaging these samples. In the following example, four sample points are randomly chosen from a pixel. The average of these four pixel values is then calculated and assigned as the final value for the pixel.
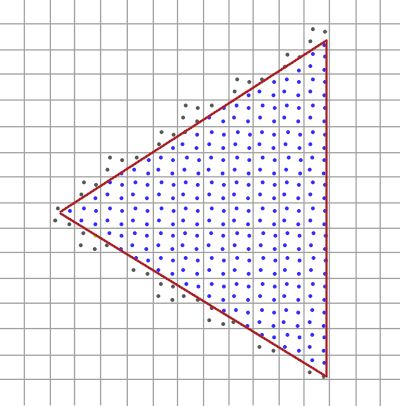
Four sampling points are randomly picked within a pixel.
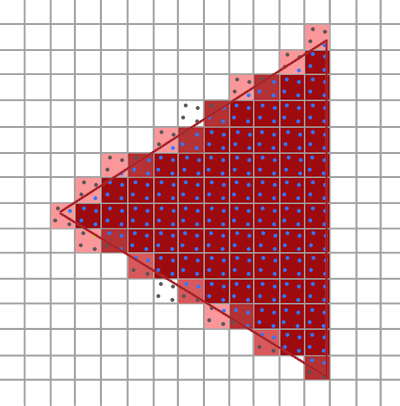
The averaged pixel value better captures the shape of a triangle.
Writing to std::cout
An additional note is that the single-threaded program writes pixel values as integers
to std::cout and utilizes the Linux right triangle bracket (>) to append the numbers
to a file, for example, build/theNextWeek > test.ppm. This approach implies that
pixels must be sequentially written out. Consequently, this design choice forces the
sequential calculation and output of pixel values one after another.
Putting Things Together
Bringing it all together, the aforementioned description is realized through the following code snippet:
std::cout << "P3\n" << image_width << ' ' << image_height << "\n255\n";

for (int j = 0; j < image_height; ++j) {
    std::clog << "\rScanlines remaining: " << (image_height - j) << ' ' << std::flush;
    for (int i = 0; i < image_width; ++i) {
        color pixel_color(0,0,0);
        for (int sample = 0; sample < samples_per_pixel; ++sample) {
            ray r = get_ray(i, j);
            pixel_color += ray_color(r, max_depth, world);
        }
        write_color(std::cout, pixel_color, samples_per_pixel);
    }
}
Transitioning from Single-Threaded to Multithreaded
After laying the groundwork for multithreading in ray tracing, it seems to me that there are three feasible approaches to introducing multithreading into the single-threaded program:
- Each newly spawned thread processes multiple samples for a pixel.
- Each newly spawned thread processes all samples for a pixel.
- Each newly spawned thread processes all pixels for a row.
The details of implementing the three approaches mentioned above are straightforward.
Therefore, I will specifically focus on how a thread manages the processing of all
pixels in a row. In essence, a thread is responsible for handling all pixels within a
row and storing the results in a vector representing the pixel colors. Subsequently, in
the main thread, it awaits the completion of each thread’s processing of the entire row
and retrieves the resulting vector of pixel colors from the futures object. Once this
vector is obtained from the futures, it sequentially writes the pixel values to
std::cout. The corresponding code snippet is as follows:
for (int j = 0; j < image_height; ++j) {
    // Multi thread
    std::shared_future<std::vector<color>> f = futures.front();
    std::vector<color> vec_pixel_color = f.get();
    futures.pop();
    for (int i = 0; i < vec_pixel_color.size(); ++i) {
        write_color(std::cout, vec_pixel_color[i], samples_per_pixel);
    }
}
Creating a Producer Thread and Multiple Processing Threads
In order to achieve the above functionality, we need a blocking queue, a producer thread and a lambda function on which every newly spawned pixel-processing thread runs. Each component is explained below:
-
BlockingQueue: This is a queue data structure that facilitates thread-safe pushing and popping operations. In thepushandpopmethods, the condition variable_condawaits the lambda function’s returned value to betrue. During this waiting period, it automatically releases the lock, temporarily halting the current executing thread.
template <typename T>
class BlockingQueue {
  private:
    std::mutex _mtx;
    std::condition_variable _cond;
    int _max_size;
    std::queue<T> _queue;

  public:
    BlockingQueue(int max_size) : _max_size(max_size) {
    }

    void push(T t) {
        std::unique_lock<std::mutex> lock(_mtx);
        _cond.wait(lock, [this]() { return _queue.size() < _max_size; });
        _queue.push(t);
        lock.unlock();
        _cond.notify_one();
    }

    T front() {
        std::unique_lock<std::mutex> lock(_mtx);
        _cond.wait(lock, [this]() { return !_queue.empty(); });
        return _queue.front();
    }

    void pop() {
        std::unique_lock<std::mutex> lock(_mtx);
        _cond.wait(lock, [this]() { return !_queue.empty(); });
        _queue.pop();
        lock.unlock();
        _cond.notify_one();
    }

    int size() {
        std::lock_guard<std::mutex> lock(_mtx);
        return _queue.size();
    }
};
-
lambda_func: The lambda functionlambda_funcprocesses every pixels in a row and store the pixel value into a vector of colorstd::vector<color>.
auto lambda_func = [this, &world](int j, int width) {
    std::vector<color> vec_pixel_color(width, color(0, 0, 0));
    for (int i = 0; i < width; ++i) {
        color pixel_color(0,0,0);
        for (int sample = 0; sample < this->samples_per_pixel; ++sample) {
            const ray r = get_ray(i, j);
            pixel_color += ray_color(r, this->max_depth, world);
        }
        vec_pixel_color[i] = pixel_color;
    }
    return vec_pixel_color;
};
-
producer_func: : The producer function,producer_func, initiates new pixel-processing threads to process pixels in a row and inserts the resultingfutureinto theBlockingQueue. It’s important to note that when theBlockingQueuesize is set to 4, the intuitive assumption might be that a maximum of 4 threads can run concurrently. However, in reality, there are potentially up to 5 threads active at any given time. This occurs because, even when the queue is saturated with 4futureinstances, a fifth thread is spawned and executed. Thefutureof this fifth thread is merely awaiting placement into theBlockingQueue.
void producer_func(BlockingQueue<std::shared_future<std::vector<color>>> &futures, int image_height, int image_width, std::function<std::vector<color>(int, int)> lambda_func) {
    for (int j = 0; j < image_height; ++j) {
        // A new thread is spawned and pushed into BlockingQueue.
        // If BlockingQueue is full, this thread will unlock the lock and wait until an element is pop out.
        std::shared_future<std::vector<color>> f = std::async(std::launch::async, lambda_func, j, image_width);
        futures.push(f);
    }
}
-
producer_thread: It is a producer thread runningproducer_func.
std::thread producer_thread(producer_func, std::ref(futures), image_height, image_width, lambda_func);
Putting all things together, we can get the following:
std::cout << "P3\n" << image_width << ' ' << image_height << "\n255\n";

const int CONCURRENCY = 4; // `std::thread::hardware_concurrency();` returns 16 on my laptop.
std::clog << "\rCONCURRENCY: " << CONCURRENCY << std::endl;
BlockingQueue<std::shared_future<std::vector<color>>> futures(CONCURRENCY); // CONCURRENCY = BlockingQueue's size

// The lambda function on which every spawned thread is going to run. Every
// thread process the whole given j-th row.
auto lambda_func = [this, &world](int j, int width) {
    std::vector<color> vec_pixel_color(width, color(0, 0, 0));
    for (int i = 0; i < width; ++i) {
        color pixel_color(0,0,0);
        for (int sample = 0; sample < this->samples_per_pixel; ++sample) {
            const ray r = get_ray(i, j);
            pixel_color += ray_color(r, this->max_depth, world);
        }
        vec_pixel_color[i] = pixel_color;
    }
    return vec_pixel_color;
};
std::thread producer_thread(producer_func, std::ref(futures), image_height, image_width, lambda_func);

for (int j = 0; j < image_height; ++j) {
    std::clog << "\rScanlines remaining: " << (image_height - j) << ' ' << std::flush;

    // Multi thread
    std::shared_future<std::vector<color>> f = futures.front();
    auto vec_pixel_color = f.get();
    futures.pop();
    for (int i = 0; i < vec_pixel_color.size(); ++i) {
        write_color(std::cout, vec_pixel_color[i], samples_per_pixel);
    }
}
producer_thread.join();
Profiling Multithreaded Programs
The ultimate way to verify a multithreaded program is to profile it and compare the performance with single-threaded program. After defining all compoments, I can compare the multithreaded program with the baseline. The baseline here is defined as using original single-threaded code to run the program.
My laptop has 16 CPUs. It means that if running a CPU-bound program, such as ray
tracing as I did here, it doesn’t make too much sense to spawn more than 16 threads.
Because if running more than 16 threads, there are not enough CPUs to run it. Therefore,
I decide to use CONCURRENCY=2 and CONCURRENCY=4 in this experiment to prevent
interference from other concurrently running software on my laptop.
The resolution of the rendered image is set at 1024 x 1024 pixels, with variations in the number of samples per pixel. Specifically, 256 and 1024 samples per pixel have been chosen for evaluation. The results are shown as follow:

256 samples per pixel results to a noisier image.

1024 samples per pixel creates a clearer image.
| Samples | Baseline | CONCURRENCY=2 | CONCURRENCY=4 |
|---|---|---|---|
| 256 | 1680 (sec) | 792 (sec) | 730 (sec) |
| 1024 | 6577 (sec) | 3108 (sec) | 2883 (sec) |
While the results of introducing multithreading indicate a reduction in overall running
time, it’s noteworthy that the performance improvement is not strictly proportional to
the size of the BlockingQueue. I would anticipate the running time to be one-fourth of
the baseline when CONCURRENCY=4.
Several potential explanations for this phenomenon are:
-
The main program (main thread) sequentially writes pixel values to the standard output. This sequential output operation might be a bottleneck, potentially hindering the main program’s ability to efficiently retrieve
futures from theBlockingQueue. Interestingly, even after disabling the pixel value output, a significant performance improvement was not observed. -
Ray tracing is an ideal candidate for showcasing the benefits of multithreading as each pixel’s calculation is independent and unrelated to neighboring pixels. The only thing is shared among multiple threads in this program is
world.worldis an object which describes the scene.worldis a constant referenceconst hittable& worldthat is read-only. According to my understanding of multithreading, if a shared object passed by reference is only read, not written, the use of mutex and lock is unnecessary during access. (However, I am curious about the low-level mechanics. How can two threads read from the same memory address (passed by reference) without causing conflicts?) -
Considering the aforementioned reasoning, I’ve tried to make
worlda constant pass-by-value object to prevent multiple threads from sharing the same object. However, there was no noticeable improvement in program performance.
Running Code Yourself
The source code is committed to this branch. The changes are made in the following three files:
CMakeLists.txtsrc/TheNextWeek/camera.hsrc/TheNextWeek/main.cc
After pulling from the branch, the following code can be run to replicate the result:
cmake -B build && cmake --build build && time build/theNextWeek > 4_threads_256_samples.ppm
It creates an image using CONCURRENCY=4 and 256 samples per pixel.
References: